They are quick & fairly easy to make...just require a bit of nimble needlework. The beauty is that they sort of come together on their own, you just need to be ready with a needle & thread. Plus, you can vary the widths & lengths to create different sized flowers.
materials:
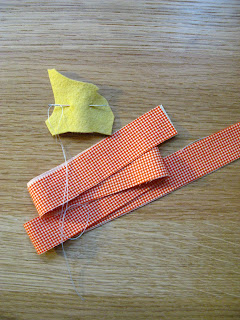
strip of fabric: 1" x 44"
scrap of felt or other fabric for backing
needle & thread
sewing machine
optional: pin backs, hair clips, etc.
Step 1: Fold fabric strip in half. Press with hot iron (the better the pressing, the easier the flower!)
Step 2: Stitch along the raw edge of your folded fabric strip. Get as close as you can to edge (this will create less bulk and more ruffle for your flower). NOTE: to create the ruffle, gently pull your top thread with a slight, even resistance - this will 'magically' create a ruffle. I hold mine at the top of my machine right near the bobbin. Tighter you hold, tighter the ruffle- tighter the ruffle more 'bunched' the flower....so you can really play around with this technique for different looks.
Step 3: Your fabric strip will look something like this. Kind of bunched up and twisty. (of course, depends on how tight of a ruffle you made). Trim threads.
Step 4: At one end, start to 'untwist' the curls.This end will be the center & you will wrap the ruffled strip around. Notice how it sort of does this on it's own.
Step 5: This is where the nimble fingers come in. Once you've made a few wraps around the center, grab your needle and thread, with one end knotted start stitching the layers. Basically, start at the inside and with a slip stitch at the very edge, catch a two or three layers. I have not discovered a clear method for this, but rather, I just make a couple stitches each time around. Wrap a bit more. Sew a few more stitches.
you can see it a bit more here
Step 6: Your stitches should not be noticeable from the front and your flower will begin to really take shape. Keep winding & stitching until you reach the end of your strip or the desired size of your flower. Tuck end under & stitch in place. Keep thread & needle out to finish the back.
Step 7: Place scrap fabric or felt on back, cover the mess. You may want to add a drop of glue if that seems easier. Be sure you trim your circle so it's not seen from the front. Again, with a slip stitch, sew around the scrap edge attaching it to just the base of the flower. This sort of pulls it all in as well.
Step 8: Presto! There you have it...a frilly, ruffly, neat little flower. Now just attach to anything you find that needs a little pizazz. A note of warning though- it's hard to stop ;)
Please let me know if you have ANY questions, need clarification, or find an error. I'm happy to help. And if you make one for yourself, do share- I'd love to see!
ps. check out my tutorial page for more projects


5 comments :
Oh what fun...I'm off to make flowers. Thank you for sharing.
Kathy
p.s. Just found you over at Martha Stewart Dreamers....
Hooray! So glad you're going to try them out. Let me know what you think.
Looking forward to connecting with you over at Dreamers & Doers as well :)
Hi Alissa !
I came here from your DiD (Dreamers into Doers)'s profile page
What a fun tutorial ! I love your zippered pouch, especially the way you choose colors and patterns
You do a great job
Citra
I love this ruffled flower and want to try it very soon. One question, though, about the measurements: is it supposed to be 1 inch by 4 FEET long??? I don't think a 4 inch strip will give a big enough flower. Can you clarify? Thanks so much!
Oh Dear! Thank you eamylove for finding my mistake- it should read 1" x 44" - somehow that other four got left out & I don't think 4" would make much of a flower.
Appreciate you spotting it :)
Post a comment ( 5 )